Coconut Curry Cod and Vegetable Noodle Bowl (Dairy and Gluten Free!)

It’s been far too long since I last posted! I shouldn’t make a habit of that.

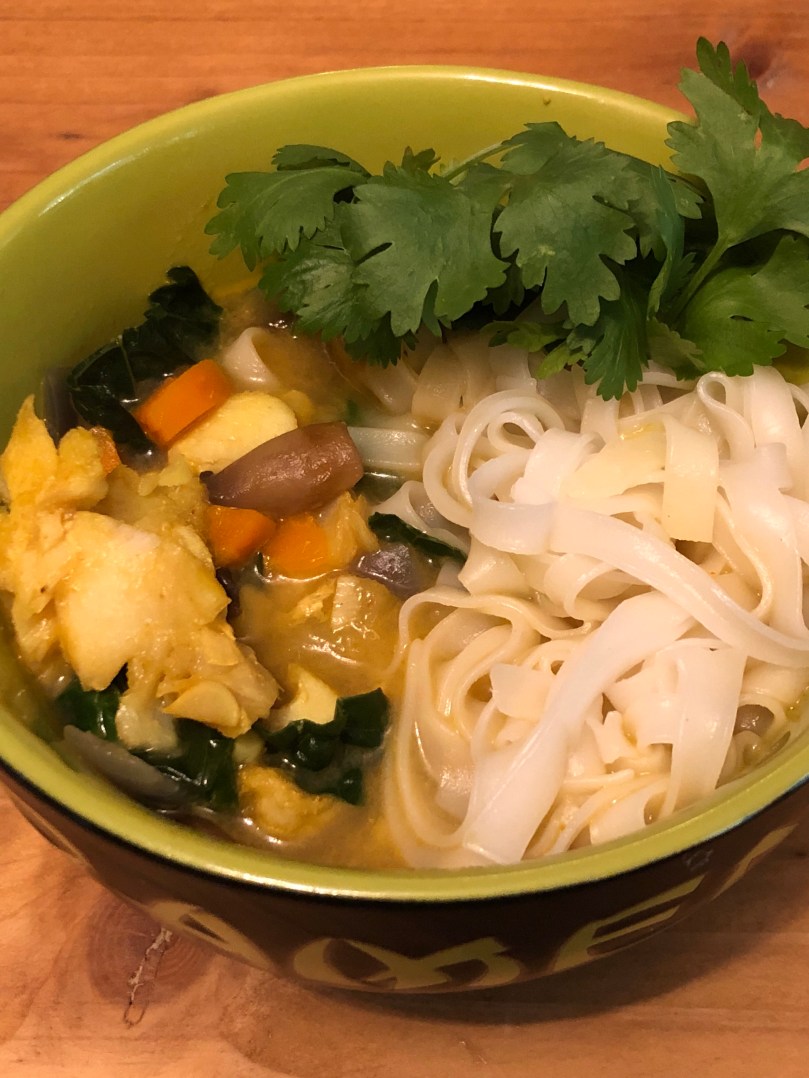
So I have an obsession…bowls! Ramen, udon, rice noodle, curry, you name it; I want to make them or try them all. This whole thing started when I found Terakawa in Philadelphia and it’s been bowls galore since then. I honestly can’t get enough of them! I even got my mom hooked so she’s testing out her own skills with these as well lol. Keep it up TJ! You’re doing great and we’re learning from each other!

What you’ll need:

    8oz large rice noodles
    2 Tbls coconut oil
    1/2 red onion, chopped
    2 carrots, chopped small
    4 cloves garlic, minced
    6oz baby Bella mushrooms, chopped
    1 squash (green, yellow or patty pan your choice)
    10 leaves kale, chopped
    4 leaves bok choy, chopped
    3 eats corn, boiled and cut off the cob (or one small can drained)
    1 lb cod filets, no skin and deboned
    2 tbls better than bouillon chicken base
    2 tsp red curry paste
    2 tsp turmeric
    2 tsp ground ginger
    12 oz evaporated coconut milk
    8 cups water
    Fresh ground pepper
    Himalayan people no sea salt
    Fresh cilantro, optional

Here’s what to do:

1. Heat the oil over medium heat until melted

2. Sauté the onions and carrots with a couple dashes of salt for 2-3 minutes

3. Add the mushrooms and squash with a couple more dashes of salt for another 2-3 minutes

4. Add the garlic, curry paste, turmeric, ginger and chicken base and sauté for about 2 minutes, or until fragrant, stirring constantly so it doesn’t burn

5. Add the water, corn and cod with a couple more dashes of salt and turn the heat up to medium high

6. Bring the pot to a bubbling simmer until the fish is completely cooked and flaky

7. While it is heating up, cook the rice noodles according to their package. Set aside.

8. Add the bok choy and kale and stir to combine while breaking up the fish into pieces if it didn’t already do that on its own. Turn off the heat.

9. Serve in a bowl with chop sticks (or fork) and a spoon. Add the soup in first, then the noodles off to one side and garnish with a rough, small handful of fresh cilantro.

Enjoy!

P.S. My awesome husband got me special ramen bowls for my birthday because I made it so much these days 😊

Advertisement

Tomatillo Verde Sauce

Talk about a versatility…this sauce is the epitome of it. You can put this on top of tacos, eggs, salads as your dressing, dip, you name it. 

What you see above is the Verde Sauce on top of a salad I threw together with the various things I had in my refrigerator. I also had left over shredded pork from pork tacos the night before (which also had verde on it 😉) that you see on top. 

The pork tacos were quasi tacos because I’m really trying to cut carbs and sugar from my diet. I used Boston Bib lettuce for the wrap but a mini romaine lettuce would also be perfect. The recipe for the pork is here. I topped everything with tomatoes, avocado, red onion, fresh cilantro, carrots, and a little extra salt and pepper to the pork. 

As for the Verde Sauce itself…

What you’ll need (and remember I make in bulk to freeze some for future so feel free to cut it in half):

  • 18 Tomatillos 
  • 2 jalapeños 
  • 4 cloves of garlic
  • Juice of one lime
  • fresh cilantro to taste
  • S & P

What to do:

  1. Boil a pot of water that will hold tomatillos and jalapeños. 
  2. Remove the husks off the tomatillos and run them under water until clean.  Also, clean the jalapeños.
  3. Boil the tomatillos and jalapeños for 10 minutes and strain. 
  4. Place them in a food processor with the remaining ingredients. 
  5. Pulse until smooth. 

Use it for whatever you want and enjoy!

    Teriyaki Chicken Stuffed with Napa Cabbage, Eggplant & Shiitake Mushrooms

    I’ve been feeling a bit creative in recent days but I’m not an artist by any means, except when it comes to food. I decided it was time to come up with a new original recipe and so here is where I landed. 

    I’ve learned that fabulous tasting food takes time…sometimes. This is sometime. There are several steps and it takes a good amount of time and patience to make this dish but I promise it will be worth it. I wouldn’t be able to make this on a work day simply because it would mean we would eat dinner about 8pm and my toddler wouldn’t be to happy with that. This is on top of the prep the day before.

    I hope you enjoy this as much as we did!!

    I also served this with a Cucumber & Cabbage Slaw that I found on Pinterest.


    What you’ll need:

    • 6 chicken breasts, pounded thin and/or butterflied 

    Teriyaki Marinade…

    • 1/2 cup soy sauce
    • 2 Tbls rice wine vinegar
    • 4 Tbls sesame oil 
    • 1 Tbls brown sugar
    • 1 Tbls quality honey (see P.S. below)
    • 1 tsp ginger, minced
    • 2 garlic cloves, minced
    • ground black pepper 

    Stuffing…

    • 1 medium eggplant, cubed small
    • 1/2 Napa cabbage, sliced thin
    • 8 oz shiitake mushrooms, sliced thin
    • 2 small chilies, your choice of how spicy, diced very small 
    • 1 medium onion, diced
    • 3 cloves garlic, minced
    • 1 Tbls ginger, minced
    • 1 tsp olive oil
    • 1 Tbls butter
    • ground coriander
    • dried oregano 
    • S&P

    Coating…

    • 6 rice paper wraps or spring roll skins
    • 2 eggs, beaten
    • panko bread crumbs, white or wheat 
    • fresh ground pepper

    Topped with…

    • Roasted red peppers, diced
    • green onions, diced
    • cilantro, optional

    What to do:

    1. Prep the marinade by whisking all ingredients in a bowl. Place in a freezer bag to which you will add the chicken. 
    2. Butterfly and/or pound the chicken and add to marinade. Put in fridge for at least 6 hours and up to 24 hours. 
    3. Later on or next day, preheat the oven to 375 degrees. 
    4. Sautée all the ingredients in the “stuffing” by first heating the olive oil, then onions, mushrooms and eggplant for 5 minutes. Next add the chiles, garlic and ginger for 2-3 min ties stirring constantly. Next add the Napa cabbage (you may need to add a little water to stem for a bit) and cover for 2-3 minutes. Set aside for next step. 
    5. Prep to stuff and wrap the chicken. Take out the chicken marinade, put some water in a shallow plate to rehydrate the rice paper, layer a sheet tray with foil and spray with oil. 
    6. Lay out each chicken breast and layer 1/2 with the stuffing. Hydrate one wrap in water. Fold over the chicken and, once limber but not mushy, wrap with the rice paper. THIS IS DELICATE! Take your time and don’t rip the wrap. Place on the sheet tray. Repeat for each breast. 
    7. Prep the rest of the coating and lay it out. Starting with the breast you wrapped first, dip each breast in egg and then in panko. (The wrap needs time to set and stick to itself. If you do this step too soon the rice paper will come off.)
    8. Bake for 30-40 minutes depending on the size of the breast. The liquid should be clear when done. 
    9. Plate and put on the toppings. 

    Enjoy!


    P.S. This is great quality honey!!!